 Save
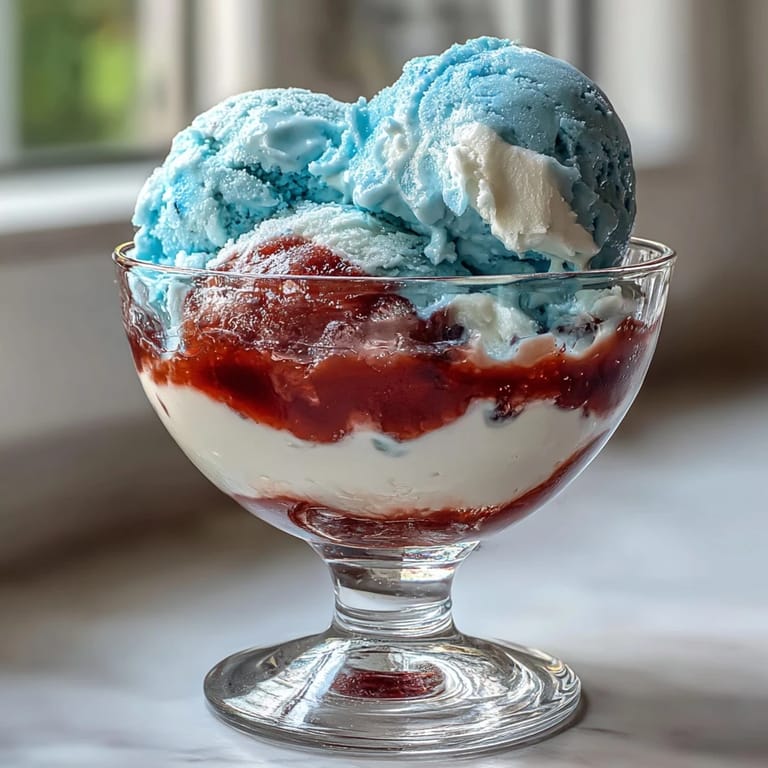
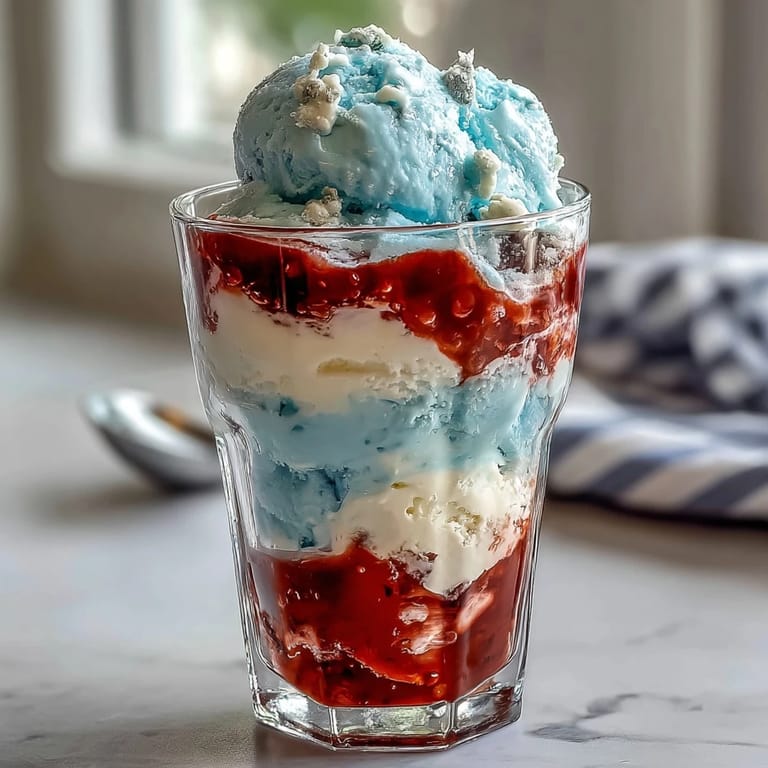
Save My daughter came home from school with a assignment to bring something red, white, and blue for a classroom party, and instead of grabbing store-bought cookies, I found myself standing in front of my pantry thinking about those gorgeous layered Jello cups I'd seen at a Fourth of July picnic years ago. The memory stuck with me because they were so simple yet somehow felt fancy, like edible art that wobbled on a spoon. I decided that afternoon to figure out how to make them, and what started as a quick project turned into this recipe that's now the first thing my kids request when summer rolls around.
I'll never forget watching my son's face light up when he took his first spoonful at that school party, the way he looked down at his cup like he'd discovered treasure. Other kids kept asking their parents if they could have extra, and suddenly I was the person known for these little cups instead of the usual chocolate chip cookies. That's when I realized it wasn't really about the dessert itself, but about how something so visually delightful made an ordinary afternoon feel a little bit more magical.
Ingredients
- Strawberry or cherry flavored Jello (3 oz box): This is your bold red base layer, and the flavor matters because it's the first impression on the palate.
- Boiling water (1 cup for red layer): Hot water dissolves the Jello crystals completely, ensuring a smooth set without lumps or grainy texture.
- Cold water (1/2 cup for red layer): This cools down the mixture so it doesn't melt the layers beneath when you pour it in.
- Unflavored gelatin (1 envelope): This is what creates that silky, creamy white layer that holds everything together structurally and visually.
- Cold water (1/2 cup for white layer bloom): Gelatin needs this blooming time to hydrate before heat activates it, or you'll end up with grainy texture.
- Boiling water (1/2 cup for white layer): This dissolves the bloomed gelatin without scorching it, which I learned after one attempted shortcut that went sideways.
- Sweetened condensed milk (1 cup): This creates the creamy opaque middle layer and adds a subtle sweetness that balances the fruit flavors perfectly.
- Blue raspberry flavored Jello (3 oz box): The final vibrant layer that catches light beautifully and gives you that complete patriotic stripe effect.
- Boiling water (1 cup for blue layer) and cold water (1/2 cup for blue layer): Same principle as the red layer, hot water dissolves and cold water cools, ensuring clean layers.
- Whipped cream and fresh berries (optional garnish): These add freshness on top and hint at the flavors underneath without overwhelming the delicate layers.
Tired of Takeout? 🥡
Get 10 meals you can make faster than delivery arrives. Seriously.
One email. No spam. Unsubscribe anytime.
Instructions
- Gather your clear cups and get organized:
- Set out 8 clear cups of 6 to 8 ounces each and have all your ingredients measured and ready, because once you start layering, timing becomes everything. This prep work takes two minutes but saves you from panicked scrambling later.
- Create the red base layer:
- Dissolve the strawberry Jello in one cup of boiling water, stirring for about two minutes until every crystal disappears, then add half a cup of cold water to cool it slightly. Divide this mixture evenly among your cups, using about two tablespoons per cup, and here's the trick, carefully nestle your cups into a muffin tin tilted at a slight angle so the layer sets in that pretty slant.
- Chill the red layer until it holds:
- Let this sit in the refrigerator for 45 to 60 minutes, and you'll know it's ready when you jiggle a cup and the surface wobbles but doesn't pour out. This patience is non-negotiable because a soft red layer will bleed into your white layer and ruin the visual magic.
- Prepare the creamy white middle:
- Sprinkle the unflavored gelatin over half a cup of cold water in a separate bowl and let it sit for five minutes while it blooms and absorbs the water. Once bloomed, pour in half a cup of boiling water and stir until the gelatin dissolves completely, then add your sweetened condensed milk and stir until smooth and homogeneous.
- Cool the white layer to room temperature:
- Let this mixture sit on the counter for about 10 to 15 minutes until it's no longer steaming but still liquid, because pouring hot gelatin over your set red layer will melt it and destroy all your careful work. I tested this theory once and learned the hard way.
- Layer the white mixture gently:
- Pour the white mixture slowly over the red layer in each cup, using about two tablespoons per cup and pouring against the inside edge of the cup to minimize disruption. Stand the cups upright now and return them to the refrigerator for another 45 to 60 minutes until this layer feels firm to the touch.
- Make your final blue layer:
- Dissolve the blue raspberry Jello in one cup of boiling water, stirring well, then add half a cup of cold water to cool it down. Let this cool to room temperature before proceeding, which usually takes 10 to 15 minutes.
- Complete the patriotic stack:
- Once the white layer is completely set, carefully pour your cooled blue Jello over the top of each cup using about two tablespoons per cup, pouring gently to keep everything pristine. Return the cups to the refrigerator for at least two hours, though overnight is honestly better because it gives you absolute certainty that everything is fully set.
- Finish with flourish before serving:
- Top each cup with a dollop of whipped cream and scatter some fresh blueberries and strawberries on top, which adds color contrast and a fresh taste that cuts through the sweetness. The presentation becomes completely showstopping with these final touches.
 Save
Save There was something genuinely touching about watching adults at a summer barbecue light up when they saw these cups on the dessert table, like they were transported back to childhood summers and picnic blankets. It wasn't fancy cooking or rare ingredients, just the simple pleasure of something beautiful and delicious that made people smile before they even tasted it.
The Science Behind Perfect Layers
Understanding why each step matters has made me a better cook overall, and with these cups it's especially important. When you dissolve gelatin in hot water, you're breaking down the protein structure so it can flow, and then the cold water sets it into that wobbly gel state we love. The white layer, made with unflavored gelatin and milk instead of flavored Jello, sets differently because the milk proteins interact with the gelatin, creating that different texture and opacity. Temperature is the real secret because if you pour warm liquid over a cold set layer, you're essentially melting the top layer, which is why every cooling step matters.
Timing and Make-Ahead Strategy
I used to stress about these taking forever, but then I realized they're actually perfect for busy days because most of the work is hands-off chilling time. You're only actively working for maybe 20 minutes total, divided into short bursts throughout the afternoon, which means you can make these while prepping other dishes without feeling overwhelmed. The best part is you can make them a full day ahead, which transforms them from a last-minute dessert anxiety into something you can feel completely relaxed about.
Flavor and Variation Ideas
While red, white, and blue are patriotic perfection, I've experimented with other color combinations because the basic technique opens doors. I've made lime, white, and raspberry versions for a friend's summer wedding, orange, white, and blueberry for Halloween thinking, and even tropical combinations with coconut in the white layer. The method stays exactly the same regardless of what flavors you choose, so once you nail this technique, you can play with endless combinations.
- Swap the red layer for orange Jello or the blue for grape if your guests prefer different flavors.
- Experiment with different fruit juice flavors to customize based on what's in season or what your crowd loves.
- Remember that the white creamy layer is your neutral, so keep that consistent and just swap the colored layers based on your vision.
 Save
Save These layered cups have become my go-to dessert for any celebration that needs a little extra visual joy, and they're proof that you don't need complicated techniques to create something memorable. The best recipes are the ones that make people happy, and somehow these simple Jello cups do exactly that every single time.
Recipe FAQs
- → How do I ensure sharp, distinct layers?
Allow each gelatin layer to fully set in the refrigerator before adding the next one. Chilling cups at a slight angle helps maintain clean separation.
- → Can I substitute flavors in the layers?
Yes, you can swap the red and blue Jello flavors with other berry or fruit options to suit your taste preferences.
- → What is the purpose of chilling cups at an angle?
Angling cups during the initial layer chilling creates distinct diagonal layers for a dynamic, festive appearance.
- → Is there a dairy-free alternative for the white layer?
Substitute sweetened condensed milk with coconut milk and sugar to make the creamy white layer dairy-free.
- → How long should the final blue layer chill?
Refrigerate the blue layer cups upright for at least 2 hours, or until completely set before serving.